Sunday, May 23, 2010

Sea Trial

A couple of days ago, I was finally ready enough to take the Seaclipper to the local lake. I worked in town until 2:00 then rushed home and with great excitement hitched the car to the boat trailer. The ride to the lake was without any trauma despite there being so many things that could have blown off or out of the cockpit. The boat was badly positioned on the trailer too, being too far forward, with too much weight on the hitch.
Once I got parked in the lot, it took me awhile to get everything untied and laid out. First real work was the unfolding of the beams and bolting the hinges in place.
I had practised the raising of the mast a number of times in my own yard, so that went easily too. I secured the stays and disconnected all my straps then backed down the ramp and slid the boat into the water. So exciting to finally see it afloat!
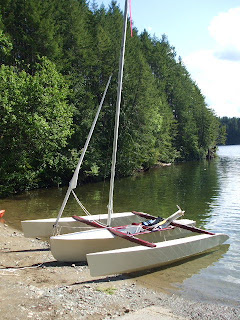

I left the rigging of the rudder and the main sail until the boat was on the beach. Took me awhile to swing the boat to get the stern in shallow enough water to pin the rudder and tie on the control lines. Raising the sail was more difficult as the wind was shifty in that little cove and the rising sail kept hanging up and pinching the bolt rope in the groove. Finally with the help of a friend who happened by, we got the sail up while keeping the boat pointed into the wind.


Took me a few minutes to organize all the lines piled in the rear cockpit, but finally I was aboard and given a push into the lake. I paddled further out of the cove and into the breeze. The boat sat as stable as a raft! A few tugs of lines locked both the rudder and the centerboard in place and I tightened the main sheet and felt the wind grab the sail.
A moment of fright as the boat heeled with the gust. Took me a little while to recall that every boat has to heel with the wind. That's what boats do!
I sailed around for awhile using only the main, getting used to the motions, the steering and the heeling. I am so used to a hand-held tiller, one that moved opposite to the intended direction, that I frequently steered the wrong way!
When I got comfortable again, I unfurled the jib and added more power. Then it got to be exciting. Lots of speed yet hardly any real motion of the boat due to small waves. The heeling of the boat settled in and I started to look for more wind, for more speed!
It felt like I was barely moving along when actually the GPS said I was at 4 knots. Just gliding! This was frantic top speed in my other boats! At about 6 knots, the rudder or the centerboard started to hum and add to the excitement. I presume that vibration is slowing me down, but for now, I don't care.
There was some rocking in boat wakes, but never any rolling if the sail was pulling.
I think the trip was a success as I had a terrific time and came home with a list of things to fix and alter. Can't wait to get back out there!

Tuesday, May 18, 2010

Two Month's of Progress

The weather has turned warm enough to epoxy anytime, knowing it will set up nicely. Construction has finished and painting has happened in spurts of warm and dry weather. Easiest to include a bunch of pictures then come back to comment on them.


I decided a simple paint scheme would be best. I used marine enamel on the creamy coloured parts and an oil-based house paint on the dark red. It took a lot of thinking and the help of a neighbour to bolt the beams to the amas. I propped them up on tall sawhorses then rolled the main hull underneath. The problem then was lining everything up for the final assembly. So, here it all is, for its first roll-out into the sunshine.


I knew the amas were heavy, but I figured they would be manageable. To try out the folding part of the operation, I undid the bolts holding the hinges in place and rotated the amas onto the main hull. That was a huge grunt! It feel like they weigh about a hundred pounds. Rolling them back from the folded position to the 'open' position was much harder again. Then my lifting was with poor leverage, making the effort even worse. I am working on some system, but it may be simplest to stand on a short step stool so my legs are more effective.

Raising the mast was the next challenge. I am using the winch on the trailer. To keep the mast from moving off to one side, I have support lines between the outer ends of the main beam and where the mast-raising line attaches to the mast. I also used a pole to change the angle of the winch line. If anyone wants more information, leave me a comment here.

This was a very exciting event. My first sitting in the cockpit with the sails, beams and amas up and in place. Much easier to see how it is going to work.
A picture to show the jib sail we made from the Sailrite kit. That project went together very nicely, including the fancy corner treatments.
I now have a long list of fun and fiddly things to make and install. Things like rudder controls, center-board controls, sheet controls etc, etc, I am facing a week of rainy weather, so I am in no great rush to get things done so I can go to the lake. Rolling the boat out into the rain will be a nuisance.
Next report should be all about the sea trials. So exciting!

Wednesday, March 24, 2010

Late March

Once again, these pictures are out of order, but the progress all blurs together in my memory too. The above picture was take just a few days ago. It shows the rear cockpit with the seat base in place. It also shows the dashboard in place, nicely secured to the back of the centerboard case and to the fir side rails. They should give great arm rests as well as places to secure blocks and deflect the waves.
This picture was taken at the same time as the first one in this entry. But looking aft from in front of the front cockpit. It also shows just a bit of the front dash board.
This shows the rear of the main hull. Instead of installing a plastic hatch cover, I made my own. It is framed in below deck to give the deck extra strength. I don't think much water will rush back there, so a much smaller screw-on hatch cover hardly seemed necessary. This should also give much better access to that area.
I could no longer work in the inner shop. The doorway was barely able to fit this hull. Next to go on were those side shelves and the dashboards. Time to re-pot this plant!
The amas were due to be connected to the beams so I moved them (with help) to the second car port and lined everything up with measured lines sprayed onto the floor. Because the mounting areas of the beams are canted, I rolled them onto their backs so I would have flat and level areas to work with.
It is getting very exciting now. Today's job is to finish the interior of the main hull forward of the front cockpit so I can install the front deck. After that, I will be busy rounding corners, filling and sanding.

Wednesday, February 10, 2010

Main hull progress

When I look back on the previous entry, I see I have accomplished a few things.
I spent several days sanding the outside of the hull and adding extra filler coats of epoxy. I have the hull pretty smooth now, but it was too cold to do any painting anyway, so I decided to roll the boat upright and go to work on the interior.
First thing I did was to measure everything to make sure it was all lined up. To my horror I found that the center board case was leaning in relation to the sides of the hull! I got out a long clamp and a spacer board and returned everything to design. It has been tied in that position for a few weeks now and each time I release the clamp I find it more vertical on its own. I have to leave the clamp on it until I get a substantial bracing part of the boat built. That would be the dash board for the rear seat.

In no particular order, these are the additions to the boat in the past few weeks. I poured epoxy into the gaps between the stem and the sides of the bow.

I cut back the bulkheads to their finished size. I added bracing on the sides for the blocks that bolt the cross beams to the main hull. I drilled, beveled and notched the blocks for those beams and epoxied then bolted them into place.


I installed rails to the sides of the boat to support the seat backs and bases. I sanded the hull interior then painted on a coat of epoxy. I glued in the little bulkheads to support the centerboard case.

Monday, January 18, 2010

Fiberglass on Main hull

It took me a few days to get all the edges filled and rounded. Weather had again turned cold.


When we were promised a week of very warm weather, I made the push to get everything ready for laying the fiberglass cloth and pouring the epoxy.


Last Thursday, January 14, was the day. My friend Manfred came over to give me a hand. Though it was around +12 in the shed, it was pouring rain.
It took us about six hours to spread the epoxy over the cloth. I was so glad to have his help.

When we were finished, I left the lights on in the boat shed to keep some heat and I left the door open too.

I went back out after dinner and found the epoxy setting up quite nicely. I decided to use a small paint roller and put on a filler coat of epoxy. That went very quickly. When I was finished, I thought I would slow the curing so it would be ready for its next coat when I woke next morning. I closed the shed door but left no heat.

Very early next morning, I returned to find the boat was slick as fresh-caught salmon. I noticed the shed reeked of epoxy fumes too. I left the door open, turned on the exhaust fan and left the lights on too. I came back in the house realizing it was not uncured epoxy on my hand. Too greasy. A quick trip through the epoxy sites made me think of 'amine blush'. I had to go to work and didn't want to leave my door open, so I closed up and left some heat on. Six hours later, the epoxy had lost its greasy feeling and had gone to feeling more like curing epoxy - tacky like masking tape. Still smelled like it had not cured. I continued the heat and fresh air treatment for the following few days and was happy to find yesterday that the epoxy was no longer tacky and the shed no longer smelled.

I gave it a good scrub with hot water and an abrasive pad. When that was dry, I risked the sander and found it was ready. It did not gum up the pad. Hooray for that! I do have one small area that was gummy yet, but if that doesn't set, I can easily cut it out and refill.

Every project has its tense moments. There seems to always be a 'fix' even though I may not know what it is. Good training for the next phase of the build and good training for sailing too. Calm down and think. There is always a fix.

Sunday, January 3, 2010

Because the weather warmed up in the last week or so, I have rushed to make progress on the main hull. Before Christmas, I screwed the frames to the building jig then cut out the bottom panel. At that point, the case for the center board had to be installed.

I made some strips of wood to follow the profile of the bottom of the boat and glued/screwed them to the matching places of the case. While that was clamped in place, I traced and cut the opening for the center board in the bottom of the boat. Taking a deep breath, I glued and screwed everything together. In this picture, I have also added the stringers to the frames. The frame with the big hole cut in, stays in the boat, but the two behind the centerboard case are temporary.

In the last few days, I got brave and brought in the side panels I had glued together in August. It was an easy job to rest the first panel against the side of the hull and trace its shape. Took it out to a cutting table and with the skil saw set very shallow, cut out the finished shape. I checked to make sure it would fit and predrilled for the screws. Once the epoxy was spread on both faces, I screwed the panel to the side of the hull. Then it was the time to attach the side with the bottom of the boat. As there was no stringer there, I drilled little holes now and again and stitched the side to the bottom with wire.

As the other side panel was not in place, it was easy to reach inside and apply little fillets of epoxy to hold those panels together.

Yesterday I took the wire ties out and put the epoxy fillets where the wires had been.

Repeated the process with the second side. That took longer as I was not able to reach inside the hull, but had to crawl underneath around the building frame.

Now the boat has a bottom and both sides. Feels great to be making progress again.

Saturday, January 2, 2010

January 2010

It has been far too long since my last posting . Too many things keeping away from the project.

One of the things has been the weeks of work in the house as well as the weeks of very cold weather, keeping the epoxy work inside the warm house.
This picture shows the case I made to hold the center board. Plywood sides and caps made of pieces of spruce. The box is lined with epoxy and fiberglass.
The centerboard is shown below. The spine is made from a two by four and has sides made of eighth inch plywood. Since that picture was taken, it too has been covered with epoxy and fiberglass cloth.

After much searching around on the net and locally, I decided I would make the folding beams out of pieces of laminated spruce. I found the local lumber store had nearly clear spruce one-by-fours in stock. I bought an armload of those and set them to dry a bit in the living room. Once they were all glued and screwed together, I cut them to length, dressed the stacks then filled the gaps with runny epoxy. A few trips to the freezing shop to use the drill press and the hinges were bolted in place. Bolt holes were drilled oversize to help the bolts line up with the hinges and once the bolts were in place, the holes were filled with epoxy.

Happy New Year! Happy to be boat building again!